STUDIO REPAIR » Roland » MC-202 » CV/Gate Mod »  CV/Gate Modification     [Image 1 of 12]  :: Jump To  
  You have reached the first slide You have reached the first slide      Show/Hide EXIF Info Index Page Start/Stop the slide show      Next slide Last slide  

Roland MC-202  •  CV/Gate Modification
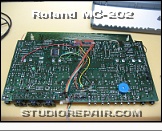
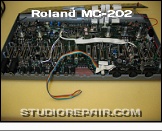
I wanted to use the two unused jack locations on the rear to carry the new CV and Gate jacks - but internally there are some parts on the PCB right behind the rear panel…
Next slide
 
Roland MC-202 - CV/Gate Modification - Image by Nikolaus Riehm
Roland MC-202 - CV/Gate Modification * …so I replaced them all to the solder side of the PCB; there's enough space between the PCB and the bottom of the case.

Roland MC-202 - CV/Gate Modification * Now there's free space for the two new jacks.

Roland MC-202 - CV/Gate Modification * They'll fit!

Roland MC-202 - CV/Gate Modification * Cut and trace for control voltage insertion.

Roland MC-202 - CV/Gate Modification * Cut and trace for gate signal insertion.

Roland MC-202 - CV/Gate Modification * The colored flat cable lead to the insertion points of CV and Gate signals in the analog circuitry of the 202.

Roland MC-202 - CV/Gate Modification * Ready to mount…


  You have reached the first slide You have reached the first slide      Show/Hide EXIF Info Index Page Start/Stop the slide show      Next slide Last slide  
© STUDIO REPAIR NIKOLAUS RIEHM 2006 - 2020